
PACKAGING BUYER GUIDE
Custom Packaging Sampling Guide: What to Check Before Production
Choose the right packaging sample for your budget, review digital or Heidelberg offset printing, and use a practical checklist before approving production. Includes real printing, cutting and load-check photographs.
A custom packaging sample is useful only if you know what it is meant to prove. Before approving production, check the fit with your actual contents, confirm the material and construction, review printing and finishing against agreed references, and record exactly which version you approve.
You may need more than one sample stage. An unprinted structural sample can help you choose a bag or box format. It cannot confirm your finished logo, print color or foil appearance.
This guide explains which sample to request, how to choose a printing method within your sampling budget, what to inspect and how to give an approval your supplier can act on. It includes a real Gaoguo sampling workflow, from digital printing and cutting to an assembled sample and load check.
Which packaging sample do you need?
Ask what will match the proposed order and what will differ. Sample names vary between suppliers; the written specification matters more than the label.
| Sample or proof | Use it to review | Confirm separately |
|---|---|---|
| Existing reference sample | General workmanship, format and material options | Your dimensions, artwork, material and order-specific construction |
| Unprinted structural sample | Dimensions, contents fit, assembly and proposed format | Printing, logo placement and surface finishes; strength if materials or assembly differ |
| Digital artwork proof (screen/PDF) | Text, artwork version, layout and proposed placement | Physical fit, surface feel, finished color and construction |
| Digitally printed physical sample | Printed layout and appearance; fit and assembly when made into a sample | Color and finish equivalence if bulk production uses a different process |
| Printed or finished sample | Appearance, logo placement and the finishes actually included | Whether paper, printing, tooling and assembly represent the intended production |
| Production-representative sample | Agreed features made with a stated production method and material | Bulk inspection criteria, batch variation and any transport testing needed |
Ask this before paying for a sample: “Which specifications and processes will this sample represent, and which will be simulated or substituted?”
A digitally printed mock-up may help you judge layout, for example, but you should not assume it establishes the color of a later offset-printed order.
Digital or Heidelberg offset printing: where should your sample budget go?
For the sampling work shown here, digital printing was the most economical option. Gaoguo can also arrange Heidelberg offset-printed samples, but the cost can be substantially higher. We discuss the purpose of the sample and the customer's budget before choosing the route.
The practical question is: what do you need this sample to settle?
| Your main decision | Sampling route to discuss | What still needs agreement |
|---|---|---|
| Does the size or structure work? | An unprinted structural sample | Printed appearance and final finishes |
| How does the artwork look on an assembled package, within a limited budget? | A digitally printed physical sample | Any differences from the intended bulk printing method |
| Do we need to evaluate an offset-printed result? | Heidelberg offset sampling with the specified material and agreed process | Exact sample scope, color reference, finishes and added cost |
Tell us your sampling budget and your approval priorities together. A lower-cost sample can be useful when its scope is clear. If a particular print result is critical, discuss whether it needs an offset-printed sample before authorizing production.
Digital printing and CMYK are not interchangeable terms: one describes a printing process, while the other describes a color model. Likewise, choosing a Heidelberg press does not by itself specify a Pantone color, paper or finishing process. Confirm these separately in the sampling brief.
A real workflow: printed sheets, cutting and assembly
The following photographs and video frame document a customer-authorized Gaoguo sampling project for branded box and handled packaging. They illustrate this project's process; they are separate from the bow-detail bag and collapsible-box cases discussed below.
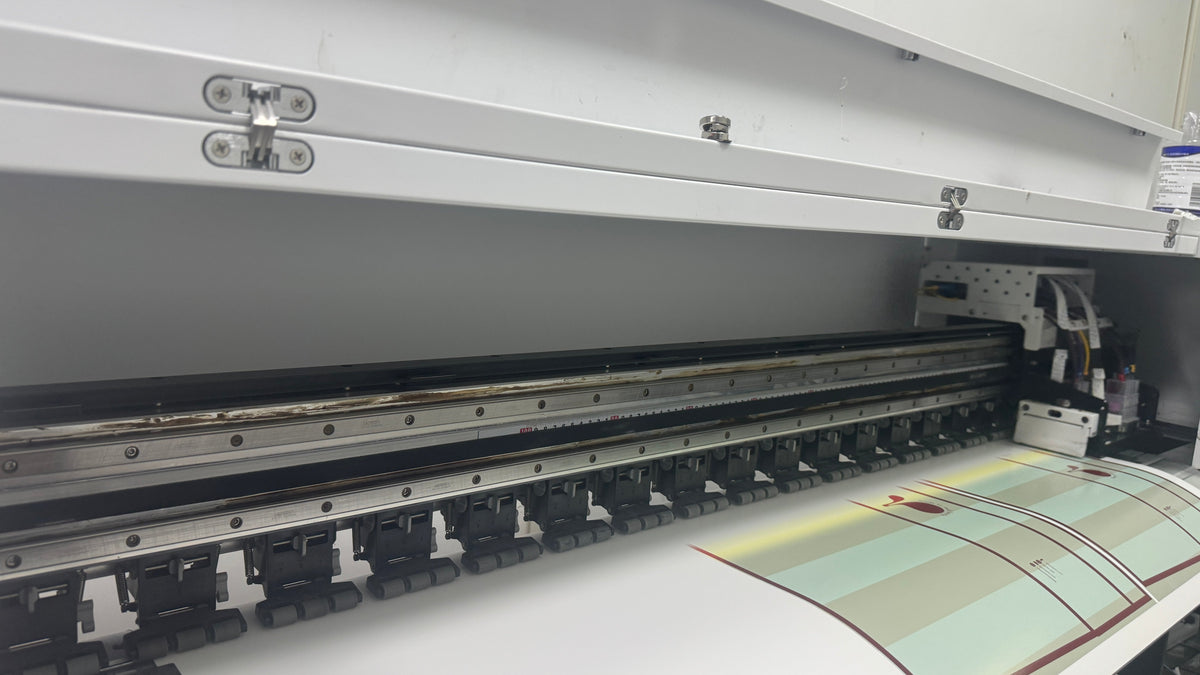
First, print the sample artwork. Here, digital printing provides physical sheets for making up the sample. Review the artwork layout and printed appearance, while recording that the sample is digitally printed.

Digital sample printing for this project. Heidelberg offset sampling is also available, with the cost and scope agreed separately.
Next, cut the sample layout. The frame below is taken from the customer's permitted process video and shows the sample-cutting stage. Review the resulting cut parts and assembled fit rather than assuming a correct-looking printed sheet proves the structure.

Frame from the actual sample-cutting process. This stage prepares the printed layout for making up the physical sample.
Review the ribbon with the printed sheets. The photograph records the proposed ribbon alongside the printed design. It helps document the component choice, but a photograph should not be the sole color reference: lighting, the camera and the screen can change the appearance.

Ribbon and printed-sheet review during sampling. Handle construction and attachment are checked again on the assembled sample.
The assembled sample and load-check photograph appear in step 5 below. Keeping these stages together makes it easier to trace what was printed, cut, assembled and checked.
1. Start with the contents, not a guessed packaging size
Give your supplier the dimensions and weight of each item, how many items go in one pack, and how they should sit together. Include anything that takes up space: tissue, sleeves, inserts, wrapping or a greeting card.
For a gift set, check the complete set rather than one item on its own. A box that fits the products without tissue may be too tight once the final presentation is assembled.
Agree whether the quoted measurements are internal or external. For a paper bag, identify width, gusset/depth and height. For a box, identify length, width and height. Use a labelled sketch and units instead of relying on an unexplained sequence of numbers.
Fit check: pack and unpack the actual contents. Look for pressure points, unnecessary movement, awkward removal and interference with the closure. Agree any clearance or dimensional tolerances with the supplier; there is no single allowance suitable for every product.
2. Use a structural sample to settle the format
Before spending time on artwork details, check whether the proposed structure works.
For a paper bag, review the opening, gussets, folded base, handle position and how the bag sits when filled. For a folding or collapsible box, review assembly, corners, lid alignment, closure and whether the intended contents obstruct the folding mechanism.
Use the custom kraft paper window box page as a further product reference when recording your fit and assembly questions.
Try the customer’s actual handling sequence: assemble, fill, close, carry where applicable, open and remove the contents. Record any problem with a photograph and a description of what happened.
Example: a bow-detail bag for a gift set
In Gaoguo’s bow-detail paper bag project, the customer wanted gift packaging that looked more distinctive and premium than an ordinary market option. Dimensions were assessed around the intended contents. Gaoguo first prepared a structural sample without the customer’s logo so the bag format could be reviewed before production.
The project used 250 gsm white cardstock. This is the specification for that case—not a universal recommendation or a carrying-weight rating. See our paper bag GSM guide for the other factors that affect a finished bag.
3. Confirm material and construction together
Write down the paper or board type, weight or thickness, surface treatment and relevant components. “Thick paper” or “premium board” leaves too much room for interpretation.
For rigid boxes, separate the greyboard body from its wrapping paper. For bags, separate the bag paper from handles and any agreed reinforcement.
| Packaging | Details worth recording |
|---|---|
| Paper bag | Paper type and gsm, dimensions, handle type and attachment, base construction, reinforcement if specified |
| Rigid box | Greyboard thickness, wrapping paper, lining, closure and insert specification |
| Folding carton | Paperboard specification, folding/gluing construction, window or insert if included |
Review appearance and practical performance together. A material may look right but need a different construction for the intended contents. If the sample uses a substitute, ask which conclusions you can safely draw from it.
Example: a collapsible rigid box
In Gaoguo’s collapsible gift-box project, the customer wanted premium presentation while reducing the space occupied during transport. The proposed format used 2 mm greyboard wrapped with 157 gsm coated art paper. The first sample focused on the structure without the customer’s logo.
When reviewing this type of box, inspect both states: flat for storage or transport, and assembled for presentation. Check how it folds, whether it assembles consistently and how the contents fit. Reduced transport space was a design objective in this project; we do not claim a measured freight saving.
4. Review print and finishing against an agreed reference
Check the artwork version, spelling, contact details, logo position and which panels are printed. Inspect artwork across folds and seams, not just the centre of the front panel.
For color, identify what you are approving: a screen proof, printed proof, physical color reference or a finished sample on the intended material. Review physical samples under consistent lighting and agree how differences will be assessed.
Our CMYK vs. Pantone guide explains why the printing method, substrate and finish matter. A color reference alone does not make every material and process produce an identical result.
For foil, embossing, spot UV or lamination, check the actual effect where it is included in the sample. Review placement, coverage, legibility, surface feel and the behaviour around folds. Record any simulated finish that still needs physical approval.
5. Record the sample load check, then consider transport testing
Fill the bag or box with the intended contents and perform the handling checks agreed for the project. Inspect the handles or ribbons, attachment points, base and assembled structure during the check.
For a further product reference, review our custom cake boxes with a window and carry handle alongside your written handling checklist.

Load-bearing check of the assembled sample during this Gaoguo sampling project. The customer has permitted this photograph to be used as evidence of that check.
This photograph documents the sample being held by its ribbon handles during the load check. The load weight, holding time, number of repetitions and test standard are not specified here, so it should not be read as a published kilogram rating, a standardized pass result or a capacity guarantee for every piece.
For a useful approval record, agree and record:
- The sample ID, material and construction tested.
- The contents and total test weight.
- How the sample is lifted or held, for how long and how many times.
- What was observed at the handles, attachment points, base and seams.
- The acceptance criteria and whether any change or repeat check is needed.
Gift packaging also needs to be distinguished from its shipping protection. A rigid presentation box may still need an outer carton and protective packing.
If distribution risks require formal testing, discuss the complete packed product, route and applicable test procedure with a suitable laboratory. ISTA explains that selecting a test depends on understanding the actual distribution environment. Passing a visual sample review is not the same as passing a transport test. Source: ISTA, Getting Started with Design & Testing.
6. Approve a version, not just “the sample”
Keep the sample identification, artwork revision, specification and outstanding changes together. Otherwise, “approved” can refer to different things for the buyer and supplier.
Use this checklist before authorizing production:
- ☐ Actual contents, accessories and presentation materials fit.
- ☐ Dimensions, measurement basis and agreed tolerances are recorded.
- ☐ Paper/board, handles, closure, inserts and finishes are identified.
- ☐ Assembly and intended handling have been reviewed; any load check has its conditions and observations recorded.
- ☐ Artwork revision, text, logo position and printed panels are correct.
- ☐ Color references and the scope of physical color approval are clear.
- ☐ Sample substitutions or simulated effects are listed.
- ☐ Required corrections have been resolved or explicitly excluded from approval.
- ☐ Bulk inspection criteria and any required tests are agreed.
- ☐ Both parties know which approval authorizes production.
Copy this sample-approval email
Subject: Packaging sample review — [project / sample ID / revision]
We reviewed sample [ID] against specification [revision/date] and artwork [filename/revision].
Approved items: [dimensions, structure, material, artwork and finishes reviewed].
Required changes: [numbered changes with marked photographs].
Items not covered by this approval: [color, substituted material, transport testing or other exclusions].
Production authorization: [approved for production / not approved—revised sample or proof required].
Please confirm the final specification and whether a further sample is needed before production starts.
Choose one production-authorization status and remove the other. If a change affects material, structure, fit or appearance, ask whether another sample or proof is needed rather than assuming the original approval covers it.
What should you ask about sample cost and timing?
Share your budget and request a breakdown of what is included: structural development, digital or Heidelberg offset printing, finishing, tooling if applicable, sample quantity and delivery. Ask which method will answer your approval questions before paying for a more expensive route. Ask whether revisions or repeat samples carry additional charges, and whether any sample fee is credited against a later order.
Confirm sample-making time separately from shipping and customer review time. A quoted production lead time should not automatically be read as the total time from first enquiry to delivery. Costs and schedules need to be confirmed for the particular project.
Frequently asked questions
Do I always need a sample without my logo first?
No. It is useful when the size or format is still being developed. If you already have a suitable design and specified materials, Gaoguo can review those inputs and arrange sampling or production as agreed. That does not remove the need for clear specifications and authorization.
Can I approve packaging from photographs?
Photographs can help review visible details and document corrections. They do not let you fully judge physical fit, surface feel or handling. Decide which features need a physical sample and what remains unverified if you approve remotely.
Does an approved sample guarantee every bulk piece will be identical?
Approval records the agreed reference and scope. Bulk quality still needs agreed tolerances and inspection criteria. Keep a clearly identified reference sample and final artwork/specification for comparison.
What should I send to start sampling?
Send the contents and packed weight, dimensions or a labelled sketch, quantity, material preferences, artwork, finishes and delivery destination. Say which decisions are still open. Our packaging RFQ checklist helps organize the brief.
Plan your packaging sample
Start with the decision the sample needs to settle: structure, fit, material, print or finishing. Then agree what will represent production and what still needs confirmation.
Explore custom paper bags or custom paper boxes, including our bow-detail shopping bag and collapsible rigid gift box.
Request a sampling quotation. Share your existing design and specified materials, or tell us which packaging decisions you need help resolving.